Showing posts with label strong. Show all posts

Tuesday, 20 September 2016

My Braces Journey: Major Update!!!!

Hey guys, I haven't posted in eons but I'm glad there are still people reading my posts..... I hope they are helpful for you. I hope that My Braces Journey series specially helpful, especially to those who are about to get braces. I was at that position once and damn I was scared.......

Anyways, MAJOR UPDATE!!!!!! I have officially passed my one year mark in June which was 3 months ago!! So by estimation I should be able to get them off in about 9 months!! I hope I can get them off earlier though....but we'll see........

Another thing I wanted to talk about was, my sister is also getting braces!!!! Yay!!!  She'll be getting hers on the 23.09.2016 which is a friday and I'm sooo super excited for her!!!

Here are some pics!!!


I hope you enjoyed this post! How's your braces journey going????
Tip of the Day: FLOSS!!! It is WORTH IT!!!!

Don't forget to comment, share and subscribe!!!!

Follow me on Instagram
Personal :@CharlotteOngYuanyuan
Photography: @CharlotteOngPhotography
Calligraphy:@aesthetic_scripts
Snapchat: @itslotteslife

Saturday, 5 December 2015

My Braces Journey: Braces Problems #1 (Dealing with Pain!!!)

Hey y'all, long time no talk.......Really sorry about that, things have been super hectic with ballet shows, rehearsals and Christmas!! Anyway, I;m back with a new post: Dealing with Pain. Firstly, congrats on getting your braces, you're on your way to a brand new smile! Or maybe for some of you, you are getting your braces on some and are scared to death. Don't worry, it's not that bad.

Pain differs person to person, for some of you, you may not feel pain till your first tightening. But for others, you'll feel he pain almost immediately. The first thing that pops into your mind would probably be:" Where did I put those painkillers??" Don't reach for those just yet, try some other methods first and if all fails, reach for that painkiller.

**Disclaimer: I am not a professional, these are all from my past experiences only

Now that the disclaimer is out of the way, lets jump right into it.....

  1. Sipping Water : Believe it or not, this actually works, especially when your front teeth are aching. Just sip water and the pain goes away for a little while.
  2. Sucking ice/popsicle; The coldness of the ice and the popsicle will give you sweet relief, trust me, and you will forget about your pain ...
  3. Distract yourself: Play videogames, go swimming, do anything to get your mind off it, the more you think about it, the more you realize the pain. 


Most importantly, don't aggravate it. Do not play with it with your tongue or with a spoon, do not grind your teeth- you will regret it with your life. If after trying all these things but you still can't deal with the pain, go for that painkiller. Eat alot of of cold foods as it will numb your gums. Be very careful while eating. Good luck......Don't forget to SMILE


Follow me on instagram for bits and pieces of my life
Personal account: @Charlotteongyuanyuan
Photography account:@Charlotteongphotography

Thursday, 8 October 2015

Taking Chances

Hey guys, long time no talk. I want to apologize for not posting the last couple of weeks, I'm really sorry. My orthodontic appointment is due next Tuesday so stay tuned to see what color I will get.

Anyway, today I want to talk about taking risks. Sometimes we don't try new things because we are worried about the outcome or what people may think of us. But you know what?? Screw IT!! I personally think its time that we stopped caring about how people will see us or what may happen in the future. Have Courage and try something new, or do something you've always wanted to do but was scared of doing.

I have been thinking of starting a new photography account on instagram for quite some time now, and you know what, I finally did it. Of course I was afraid that nobody would like it and that nobody would follow me but photography is my passion and I'm going to follow it. Speaking of which, please go check out my new photography account @charlotteongphotography on instagram (#shamelessselfpromotion).

One of  my pictures from my ig account


"Follow your passions and try something new this week. I Double Dare you.."


Don't forget to leave a comment, share and subscribe to this blog.
Follow me on instagram and twitter (comment if you found me on my blog, I'll follow you back!!):
Instagram:@CharlotteOngPhotography
Twitter    :@OngCharlotte

Tuesday, 23 June 2015

My Braces Journey: Getting My Braces On.

Hey guys, long time no chat.......So, I have gotten my braces on for a week now and I'm ready to blog about my experience with it so far.

I got my braces on the 16th of June 2015 at 8.45 am. When I got To my orthodontist clinic (Ong Dental Surgery),  I had to wait a while before they called me in. This was the first time I actually had to wait because normally I get sent in immediately. In the waiting room,   I was pacing, my hands were sweaty, and I kept talking. Needless to say, I was nervous, BIG TIME. Also did I mention that I met my best friend Danielle there too. We go to the same orthodontist. Her appointment was before mine. After a hug and telling me good luck, she left (insert crying emoji here).

Anyways, back to the subject. I finally got called in. My darling little sister Lynette (or you may know her as The Fangirl Diaries) came  in with me. Dr. Eddy was just sitting there in his chair, wearing the white surgeon gloves (cue dramatic music and some lightning strikes). But he was very nice reassuring me telling me that the hard part was over and this procedure was going to be easy...... but did I listen? No!!!!! No I didn't. I went on telling him how scared I was to have my implants put in..... Thank God he reassured me by saying that they knew what they were doing....

After some prep talk, he began my procedure..

Step 6 (con't from last post): Polishing

First, they inserted a 'smile maker into my mouth to keep it open. Then, they polished my teeth with a electronic tooth brush looking thingy. This does not hurt or taste bad.
Smile Maker

Teeth Polishing

Step 7: Putting the Brackets on

They then swiped some glue on each tooth and started re-positioning the brackets. They then put a UV light over it for a few seconds. This process took quite a while as they had to do it tooth by tooth. The glue does taste bad and it stung my lip, but all in all, it wasn't terrible
Positioning of the brackets
Step 8: Inserting the archwires

At this point, your orthodontist should start putting on your archwires, but for me the orthodontist had to inject some anesthesia into my gums so that he could insert the ortho mini implants. He waited for a while to let the anesthetics to kick in before screwing, literally screwing the implants in, and let me tell you, it doesn't hurt one bit. Not even a pinch. Amazing right? Considering two little screws just got screwed into your gums. After that, he inserted the archwires. 
Basically what he did with the mini ortho implants

Arrows on the archwire
Step 9: Choosing a colour

This is probably my favourite part of all and the most fun in my opinion. The best part is that you get to pick a new colour each month!! This month I went with a light blue colour. Depending on your orthodontist, the colours may vary. Some even have a glow in the dark version. you just have to keep smiling in the sunlight for it to glow. after picking your colour, they simply put it on and you're done! After the whole process your lips will feel dry, very dry, so I recommend putting on a layer of lip balm before you go for your appointment. My best friend throughout this journey so far has been lip balm, I know a lot of people say its wax, but for me it's lip balm. My lips are always super dry. Carry lip balm or lip gloss wherever you go especially if you're the type that doesn't like make-up, (like me) I always forgot my lip balm, you'll suffer.
Braces colour wheel

So that was the process of getting my braces on, I hope you understood it. For me, it started hurting immediately and I had to take painkillers three times on the first day and once on the second day. I had to stick with a lot of liquids and mushy foods for the first two days, but I was back to eating solids on the third day!! It depends on the person. I actually have a friend that didn't even need liquid or mushy foods on the first day. For some reason, my teeth hurt the most at night, I got a tip from a friend telling me to sleep on my belly and it helped tremendously. I was extremely blessed because I got used to my braces very fast and I didn't get any ulcers on my lips at all. Every ones braces experience will be different so don't worry. Here are my first week with braces pictures.
From the front
From the side

From the bottom

I actually received comments on how much my teeth improved in only the course of one week so I'm optimistic for the future. Talk to you guys soon in my next post. My next post will probably about my mouth care routine and the things I got from the orthodontist. See y'all soon... Byesss

Wednesday, 20 May 2015

My Braces Journey: The Second Appointment- Removing Sutures and Inserting Molar Bands

Hi y'all, I've had my second appointment a while ago but only just recently have time to blog about it.
For those who don't know, I  had my second appointment on the 5th of May.

My appointment was at 8.45 in the morning( it was a tuesday), I got called in almost immediately after I arrived to the clinic. When I arrived the dentist checked that all 8 of my spacers were still in there( to make sure I didn't accidentally swallow any, thank God i didn't!!)After that, he removed my sutures(little black stitches in my gums). My appointment was supposed to end here, until I opened my big mouth and asked if my spacers are going to be in until I get my braces on. My orthodontist said that he could take them out now and put in my molar bands instead. I stupidly agreed......

Step 4 ( cont. from last post): Scaling

Before anything else could proceed further, he scaled my teeth. (To those who have never had their teeth scaled, don't worry , it doesn't hurt)This took about 3 minutes. After that he tried on the molar bands on my teeth (as molar bands come in different sizes, this could take a while) Finally!! He found sizes for all of my four molars!
A before and after pic of teeth scaling ( these are NOT my teeth)


Step 5 : Insertion of  Molar Bands
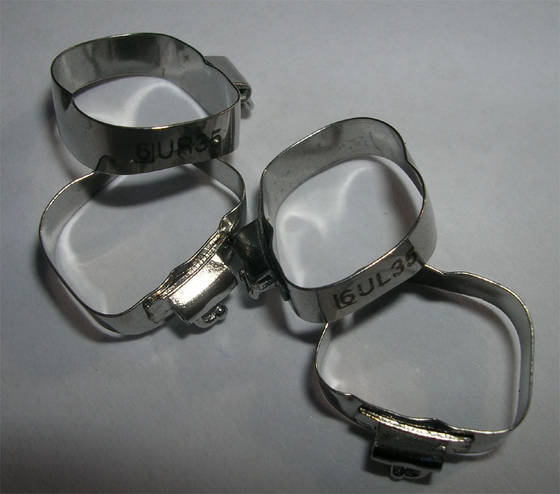
To find the size of your molar bands, the orthodontist has to painstakingly try on each size that he thinks might fit. It's not a really super long process, he may ask you to bite down and may push down on your teeth. You will feel pressure only, no pain. Once he has found the perfect fit for all the molars, he will remove all of it and apply glue on the bands so they don't come off. He will then insert them onto your molars and core it for a few seconds with an Ultraviolet (UV) light.
Molar Bands
Before Pictures
From the front


From the side

From the bottom
I'll be getting my braces on at my next appointment which is on the 16th of June at 8.45 am. Wish me luck.....I'll blog about it after a day so I can tell you about all the pain and stuff. I hope you are doing well on your own braces journey. See you guys soon. MUAKKS!


Monday, 13 October 2014

What it Takes to be A Ballerina........

"Ballet". What is the thought that comes into your mind when you hear that word? Let me guess. Pretty ladies prancing about on their toes in tights and tutus???? Well, I'm pretty sure that at least 90% of the people in the think this.....but I'm here to tell you that it isn't that simple.

Mary Helen Bowers, a dancer with New York City Ballet.

To be able to make it as a Ballerina you need........Dedication.
You must be ready to sacrifice your afternoons, your nights out to practice and to attend classes. Being able to balance on the tips of your toes doesn't happen over night.  Neither does nailing that perfect grande jete.
Grande Jete

Ballerinas, especially Professional Ballerinas work very hard, to give off the illusion of grace and poise. Onstage they may look on this, smiling like dancing was the easiest thing on earth.
They make it seem easy
Let me take you behind the scenes, their feet are covered in blisters and  calluses. Bleeding from balancing their whole body weight on the tips of ten toes. They say: "A  picture says a thousand words", so here it is.....
This is one of the less severe ones. 
Take a look for yourselves.
Doesn't it look absolutely disgusting???? Some of you may be wondering, " If it hurts so much, why are they still dancing?"
Why??? Because they have a passion for dance....... They are willing to sacrifice their nights out and afternoons off to work their butts off. Stretching their muscles to achieve that oversplit and even sacrificing their feet. I hope after reading this you will not think of Ballerinas as just pretty ladies prancing around on their toes in tutus and tights, but respect them for the strong and graceful women they actually are.......
This my friends, is what it takes to be a Ballerina.......... 

Don't forget to subscribe for Future Content.... Bye!!!!